Monday, June 6, 2011

Dreaming (test of a new concept)

For a client shoot I have to do soon, I want to do something different, the client wants a not so standard family photo. After giving it some thought I asked her if she would like it to do something with silhouettes of her and her husband and the kids in "normal" light. As a divider I thought that foil (the type you use to cover your furniture when you are painting your living room) would be nice. And it has to be done outside.
So before I make a huge ass of my self, I decided to test the concept first on an out side location and see what kind of problems I would encounter.
 The set up:
Setup: Dreaming by Ragoem
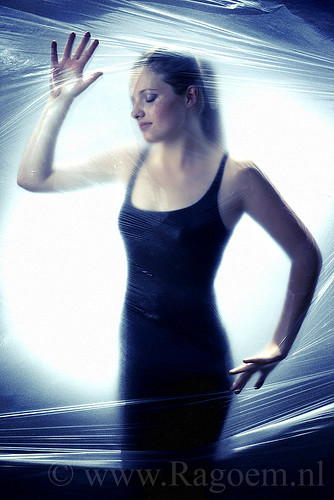
Setup: Dreaming, a photo by Ragoem on Flickr.


The setup was pretty easy: A mobile background with white bedsheets hanging from it. In front of that two light stands with a cord between them, to hang the foil on. All secured with some guy-lines so it would not blow away in the wind. So I thought I covered all the problems. But theres always something you don't think of isn't there? Yep, in the wind the foil just ripped because it's that thin. Fortunately I had two assistants to help hold the foil down. But I know that I only have one assistant on the client shoot.
On with the lighting part: I used 4 flashes (2 LP160 and 2 5400HS) all four on the background to see if I could over power the sun the way I want. Result: in the shade: Yes, in direct sunlight: No. So it's back to the drawing board on that. But may be I already have the solution, which is to use a light colored building's shadow side as a backdrop.
Now I knew that what I wanted to know I decided to get one flash in front of Roos an the foil to light her face. And with the two assistants to hold the foil tight I asked Roos to lean into the foil and close her eyes.
Dreaming by Ragoem
Dreaming, a photo by Ragoem on Flickr.
Processed the photo in Photoshop. And see above for the result.

On stage

Trying to boost my creativity I gave my self the assignment to do a shoot with all the PG6s slave flashes I could get. I started out with 4 but ended up with 10 PG6s's.
If possible I only wanted to use the PG6s (all in frame) but if necessary I would use other flashes (out of the frame). (I believe that the result counts and not the equipment you use. Yes, it can be a challenge to use only some flashes, but keeping the PG6s in frame and get good result can be a in some cases impossible.)
The first idea I had was to lay Anne on some kind of stage, with some floodlights at her feet. Because I had 10 flashes I decided it would be nice to place a row of light behind/above her.


On stage by Ragoem
On stage, a photo by Ragoem on Flickr.
I knew I had a wooden beam with holes to fit the spigot on top of a light stand. But the beam was not painted.  So out came the paint to make it black so it would blend into the background.
Now I needed a "stage". I still had an old board with holes from a bed somewhere. And lent me some crates from the the local supermarket to put the board on. The background fabric would continue over the "stage".
To ad some theatrical atmosphere to the photo, we garbed our Mister cool smoke machine and some ice from our fridge to create the low smoke in front of Anne.


Another idea I had was to make a circle of lights around Anne.
So what do i need? I have 10 light so I need 10 light stands.
I arranged the light in such way that they were low in front of her and high above her behind her.


Ring of light by Ragoem
Ring of light, a photo by Ragoem on Flickr.

But now I had a problem, the light in her face was coming from below, so i decided to use an extra flash.
I grabbed my GN300AD with the snoot set it to 1/2 power and aimed it on Anne's face, left from the camera facing down.
At the end, I asked Anne if she would hold one on the flashes in her hand and look into it while I made the picture. We made only a few of these ones because the PG6s's have a lot of power that close, and that is not pleasant for the eyes.


Hold the light by Ragoem
Hold the light, a photo by Ragoem on Flickr.

There  is still room for improvement but after all I think I succeeded on my own assignment.


Friday, May 27, 2011

Thunder

Thunder by Ragoem

Thunder, a photo by Ragoem on Flickr.

This afternoon Sverre and I were goofing around in our garden, when I decided that it was a while ago that I had taken some picture of him. So out came the camera, but (you would not say it looking at this picture) it was very sunny with some clouds drifting by. Because I wanted to fil the shadows with some light and use the sun as a rim I grabbed my westcott Apollo mini with my F58AM flash and a TTL-cable. The cable came out because the light conditions were changing constant and Sverre was playing, so to do it manualy would be a hell. So I set my A900 to Program (yes, normaly I would never use P but I knew it would do the job I wanted) connected the Flash in the apollo to the camera and shot several pictures of Sverre. When I saw these clouds come by, I sat down on the ground to get this angle and asked Sverre to look in the flash what he reluctantly did. (as you can see ;-) ) Changed the color a bit to blue with a bit desaturation and added some contrast in photoshop.

Monday, May 2, 2011

Shooting Lindsey at the Sint Jansberg

Lindsey at a creek by Ragoem
Lindsey at a creek, a photo by Ragoem on Flickr.
Last sunday we did a shoot with Lindsey, it was her first time posing for a photographer.
We had some idea on what we wanted and one thing was to use a location with lots of green/nature, so we dicided to scout the forest on the Sint Jansberg last thursday. Walking around we found some great locations for our shoot within walking distence from the parkinglot.
So Sunday we asked Lindsey to put on her gown, Monique did her hair and makeup and of we went to the Sint Jansberg.
I told my self to try to keep the light I would use to a minimum but if necessary use what I need. (the end result counts for me NOT the technic used to make the result, so if the photo dictates more lights I use more.) But looking back my "mission" was successful. The only time I used 2 strobes was when I needed more power/recycle time on my flash. I knew upfront that al the pictures would need at least one flash, we would be shooting in a forest in the shade and with any luck (which we had) the sun would shine. So sunshine in the background and model in the shade, I need flash to light my model.
We had lots of fun and great result.

For the photo above we went to a little creek and positioned Lindsey on the bank so I could get her in the frame with the creek and the forest on the backgound. For the lighting I used 2 LP160 on a bracket from DIY-photography at 1/4 power trough a white umbrella. Monique was holding the lights above the creek to light Lindsey.

For the photo below we used a tree branch for Lindsey to sit on, leaning her against the tree.
For the lighting of this photo I used the same 2 LP160 but now at 1/8 power and a siver umbrella to get a slighty harder light than the white umbrella. In post I desaturated it slighty and added some grain, why you ask? I think the photo needs it.

Lindsey sitting against a tree by Ragoem
Lindsey sitting against a tree, a photo by Ragoem on Flickr.

Saturday, April 23, 2011

Life

Life by Ragoem
Life, a photo by Ragoem on Flickr.
The idea for this photo came to me a few days ago. Saw a photo of a box of five eggs and a drumstick. Thought I would do it differend, at first I wanted to do 2 eggs, 2 drumsticks and 2 bones. But later on I thought it would be better to use 2 chicks and leave the bones.

But there was a problem, I couldn't get my hands on 2 life chicks and went for some fake chicks, whome I could get everywere because it's almost easter.

For the background I used some jute and over that some straw on which I placed the egg-box with the eggs, chicks and drumsticks. Placed a Minolta 5400HS with a 4.5cm DIY straw grid direcly overhead. Tada, thats it.

Thursday, April 21, 2011

How I did: Color Cubes RGB and CMYK

RGB by Ragoem
RGB, a photo by Ragoem on Flickr.

CMYK by Ragoem
CMYK, a photo by Ragoem on Flickr.

I'm getting several questions by mail lately on how I did these photo's of Melanie (RGB) and Annemijn (CMYK).

The whole idea behind this was: make for both color systems cubes and put the same model into al four cubes. Forming one big cube. Rinse and repeat for the other color-system.

Groen, a photo by Ragoem on Flickr.
Groen by Ragoem
I already had done a serie with colored cubes, "Groen" on the right is one of the photo's out of this serie. But if I wanted to use the cubes from this serie I had one big problem; the six cubes are made out of cloth in six differerend colors and than hung in a frame. So they are not square. And only the floor is hard, so the model couldn't lean against the walls of the cube.

To make more use for other shoots of the cubes, we did not want to make them very small, but as big as possible. So we had to search for tall models and we found a tall one (1.85mtr) at the local supermarket, and she had an even taller friend who also wanted to model for me.
We made the cube (yes, made only one) to fit Annemijn in the way I wanted. Meaning she could just get her leg straight in the cube. Now the problem was what to do with the colors, make one or more cubes, paint them the right color, make some sort of covers for the cubes. What was practical and even more important, how much would it cost. We decided on one cube (110x110x110cm) made out of 8 or 12 mm plywood and a pine frame on the back to make it stiff and to clamp the five pieces together. First we wanted to paint the cube but that would main one shoot, paint, a week later next shoot, etc, etc. this would make atleast eight weeks work sanding and painting and at the end one color cube. So my dear wife offered to make me 40 (8 colors with 5 panels) covers which would fit all five panels. So we could do two colors in one day and a whole serie in two saturdays. So all eight color were done in four saturdays.

After the photo-shoots where done, we made several sets of cubes with differend themes.
They were merged together in to photoshop to form the end cube, where I also made the colors more RGB/CMYK.

Two of the results can be seen above.

Sunday, April 17, 2011

Review: DIY Ring Flash

The ring flash from DIY Lighting Kits comes as a kit (of course).

It's very easy to assemble even our 9 year old neighbor boy who doesn't speak english, could see how to put the kit together.
The inside is cardboard with silver print and the outside is soft plastic.
It's done in a few minutes.(by me, not my next door neighbor boy)
To put my Minolta 5400HS into the ring flash, I had to make some cut's in the corners as discribed in the manual.

My first impression: Good, it looks and feels solid.

The next thing to do is bend the bracket for the flash. Now there are marking where to bend the bracket in the manual, only not for Sony. So out comes the tapeline to see where i should bend it for my A900 w/ grip.
Only to find out the bracket wil only fit without my grip on the camera (the bend and the holes for the bracket can not be in the same spot). So I go for option two in the manual; tape the flash to the ringflash.

First to test the light output compaired with my Orbis ring flash.
At first no surprise to me, the orbis in comparison with the DIY has a higher output at 1/1 an a zoom of 105mm with a 5400HS, but what if a change the zoom for the DIY (for the orbis they advice is: max zoom) to 24mm. Surprise the DIY has a slightly higher output. See picture below.
As comparison I shot three photo's of Linsey one with the Orbis, DIY and my FE4M Ring flash:

Straight out of camera
1. Orbis @ 400ISO f4.5
2. DIY @ 400ISO f4.5
3. FE-4M 100ISO f9.0

Oke, the FE-4M has a lot more output (it was set at min. power), but its a 400Ws flash.
But compaired with the orbis there is not much difference.
Yes the orbis is more rigide and durable but it will set you back about 150euro.
As for the DIY ring flash it will set you back only 25.95 USD.
If you use a ring flash on location a lot, the DIY ring flash may not be durable enough, it's not made to travel (it's made of cardboard and flexable plastics so you can't stuff it into you bag).
But if you shoot around the house/studio and occasionally on location, or are a bit carefull with it when you travel it's a great alternative. (and a lot cheaper)

Will be editing some photos of the shoot I did with Linsey. Put them one later this week.

Here is the first one:
Linsey (DIY-Ring Flash test) by Ragoem
Linsey (DIY-Ring Flash test), a photo by Ragoem on Flickr.